Monday, January 17, 2011

Happy Birthday to me!

My Birthday was this past weekend, so I thought I'd show you a LO I created for a previous birthday party:


Bless her, my mum made that cake for me yearly until I was grown, and occassionally afterward. Pound cake,with a layer of whipped cream on top, then covered with tinned mandarins. I suppose those little oranges would have been quite the treat in 1976 Belfast, N. Ireland!


Supplies:
Cricut cartridges: Storybook and Graphically Speaking
Paper: solid cardstock and K&Co Wild Saffron
Liquid Pearls
ATG adhesive
matching brad
Colourbox ink pads
Martha Stewart "Happy Birthday" ribbon
Spellbinders: Blossom
Tattered Angels glitter mist: Sunflower

To make the grunge flower:
Use spellbinders to cut 4 different-sized flowers in coordinating cardstock. Mist lightly with water, then crumple together. Allow to dry slightly, then uncrumple and layer largest to smallest. Attach layers together with a brad, then fluff and mist with Tattered Angels. Allow to dry.

Enjoy! (I think I might make one of those cakes for my girls this weekend!)

Saturday, January 15, 2011

Editing!

My Family and I returned back from holiday two weeks ago, and I've been slowly going through the 1585 photos that we took. Oh dear, how to make a scrapbook of all those photos....??? Well, I started with picking my favorites, and editing. I'll have a tutorial on how I did the choosing and organizing a manageable amount, but today I wanted to show you the importance of editing. It can take a nice picture and make it something special!

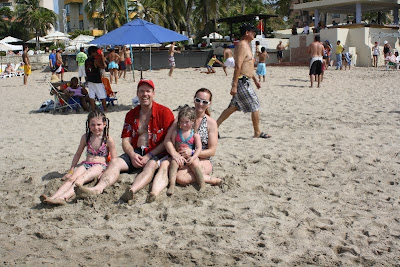
Here's the original:


Obviously I didn't take this! Thank you to the lovely lady who did, but couldn't she have waited for that guy to move? And the background's so busy. I'm only interested in my family.

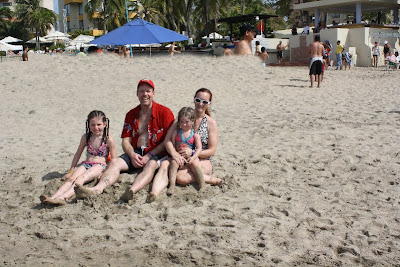
So, using my favorite free editing software, GIMP, I cloned regular sand and got rid of the walking man coming out of my shoulder. Then I looked again, and decided to get rid of the other background noise. Here's the cloning result:


Looks a bit strange, but just wait... a crop to 8x10 proportions, and this one is ready to print!


This crop was done in GIMP, but you could easily do this after uploading to the photo developer. Did I mention GIMP is free? And it's quite similar to Photoshop. I <3 GIMP!

Don't forget that I have done GIMP tutorials on cloning and tidying up photos. See my post on Photo Restoration or watch the video I made for that post at my Youtube Channel.

Thanks for stopping by!

A Little Bit of Bling!

Today's LO is using old set of pictures, in which I wanted to convey a sense of excitment. I think I managed it with the bold and kind of crazy paper:


I know, lots of us are afraid to use those big crazy bright patterns in large quantities. I say, GO FOR IT! Up close of left side:


Right side carries over the colours, but more muted to add emphasis to the journalling:


Cheese-y pun!


The journalling, done with a white ball-point pen. I always prewrite on blank paper and edit. Then I test the pen I want to use on scrap. I had tried black and brown first, but the white looked so much better!


Supplies:
DCWV Summer Dream Stack
Fonts cut with SCAL2: Brush 455BT ("Fair") and Crazy Girlz Blond BTN Lt (everything else)
Frosted Lace Stickles
Rhinestones
Ink (all edges)

Saturday, January 8, 2011

Snow Much Drama!

This is from DD#2's first encounter with snow:


Supplies:
Paper: Me & My Big Ideas "Sugarplum"
Cricut Cuts: Wall Decor and More, Gypsy Wanderings, Gypsy Font and Cuttin' Up
Cricut markers
White Snowflake brads

Saturday, December 25, 2010

Merry Christmas!


See you in the New Year, I'm away on holiday for a week, taking lots of pictures that might (or might not) get scrapped!

Thursday, December 23, 2010

My Sheri Crafts -- Mists and Sprays!

A simple LO for My Sheri Crafts this week! The theme is Mists and Sprays, and I've used Tattered Angels Glimmer Mist on the Giraffe of this page:


It's very pretty in person, and blends all the colour together nicely :-) I really enjoyed making this little guy; it's a cut from the fairly new, Birthday Bash cricut cartridge.

Supplies:

Paper: K&Co Gypsy Baby
Paper Ribbon from my stash (unknown brand)
Giraffe and 3: Cricut Birthday Bash
Brads and Eyelets: Making Memories
Tattered Angels Glimmer Mist, Sunflower

Glitter Christmas Ornaments

This week, my two daughters and I made those Glittered Christmas ornaments that seem to be all the rage on the crafting boards this year! Here's the ones we made:


Supplies: Pledge Future Shine. This can be kind of tricky to find, but I got mine in the floor cleaning section of Real Canadian Superstore (Canada). I've heard it's available in Wal-mart, but not in the regular cleaning section. Here's what it looks like:

Martha Stewart Fine Glitter. I bought the 24-pack one, and did this project with a classroom thirty grade 5/6 students. We used about two-thirds of the glitter, but ended up with 60 glittered balls (and they were none too careful! It got spilled and spread all over the room!). This stuff goes a long way!


Glass Ornament balls from Michaels
Ribbon
Vinyl or stickers
Cricut and font cartridge of choice (I used Winter Woodland)

Instructions:
1. Open Glass ball. If dusty, rinse and allow to dry.
2. Pour in about an ounce of Pledge Future. Swirl around, coating entire inside. Drain back into bottle for reuse. Allow to drain completely, about a couple minutes.
3. Use a funnel to pour a generous amount of glitter into the ornament. Shake to coat thoroughly. For two-tone ornaments, carefully swish glitter just where you want it. Drain excess.
4. Replace lid. Cut vinyl letter or shape and adhere. Hang with ribbon and enjoy!

My 8 year old daughter did this with no assistance, just supervision, and my just-turned 3 year old did the pouring and holding with help, and very much enjoyed the shaking and applying stickers!