Saturday, December 25, 2010

Merry Christmas!


See you in the New Year, I'm away on holiday for a week, taking lots of pictures that might (or might not) get scrapped!

Thursday, December 23, 2010

My Sheri Crafts -- Mists and Sprays!

A simple LO for My Sheri Crafts this week! The theme is Mists and Sprays, and I've used Tattered Angels Glimmer Mist on the Giraffe of this page:


It's very pretty in person, and blends all the colour together nicely :-) I really enjoyed making this little guy; it's a cut from the fairly new, Birthday Bash cricut cartridge.

Supplies:

Paper: K&Co Gypsy Baby
Paper Ribbon from my stash (unknown brand)
Giraffe and 3: Cricut Birthday Bash
Brads and Eyelets: Making Memories
Tattered Angels Glimmer Mist, Sunflower

Glitter Christmas Ornaments

This week, my two daughters and I made those Glittered Christmas ornaments that seem to be all the rage on the crafting boards this year! Here's the ones we made:


Supplies: Pledge Future Shine. This can be kind of tricky to find, but I got mine in the floor cleaning section of Real Canadian Superstore (Canada). I've heard it's available in Wal-mart, but not in the regular cleaning section. Here's what it looks like:

Martha Stewart Fine Glitter. I bought the 24-pack one, and did this project with a classroom thirty grade 5/6 students. We used about two-thirds of the glitter, but ended up with 60 glittered balls (and they were none too careful! It got spilled and spread all over the room!). This stuff goes a long way!


Glass Ornament balls from Michaels
Ribbon
Vinyl or stickers
Cricut and font cartridge of choice (I used Winter Woodland)

Instructions:
1. Open Glass ball. If dusty, rinse and allow to dry.
2. Pour in about an ounce of Pledge Future. Swirl around, coating entire inside. Drain back into bottle for reuse. Allow to drain completely, about a couple minutes.
3. Use a funnel to pour a generous amount of glitter into the ornament. Shake to coat thoroughly. For two-tone ornaments, carefully swish glitter just where you want it. Drain excess.
4. Replace lid. Cut vinyl letter or shape and adhere. Hang with ribbon and enjoy!

My 8 year old daughter did this with no assistance, just supervision, and my just-turned 3 year old did the pouring and holding with help, and very much enjoyed the shaking and applying stickers!

Friday, December 10, 2010

My Sheri Crafts -- Celebrations

This LO is with pictures from a fabulous company Christmas Party in 2008. I love the paper, Me and My Big Ideas: Sugarplum, and the cuts are from Cricut Christmas solutions cartridge.

The whole Double Layout:


Left Side:


Right Side:


Journaling, done on vellum, dotted with a white marker, reindeer drawn by hand:


Santa's beard and eyebrows were done with the same paper, but flocked in Martha Stewart white flocking. Beautiful in person!


Now, make sure you check out My Sheri Crafts this week and enter the challenge!

Friday, November 26, 2010

This week's challenge on My Sheri Crafts blog is "Hello"! I thought about using this expression in an unexpected way, on a LO. So, here's my "Hello Reader" LO of Hannah as a baby, reading a fabric book:


Love all the glitter on this page. It doesn't come through as nicely on the photos, but "Hello" and Elmo's book are Stickled!

Supplies:
Sesame Street and Friends Cricut cartridge
Stickles
Foam Dots and adhesive
Paper: Me and My Big Ideas, "A Kid Like Me"
Font for "Hello": Vivaldi, cut with Sure Cuts A Lot 2

Saturday, November 20, 2010

Cutting Chocolate with Cricut

My lovely eldest daughter has her 8th birthday fast approaching, and since it's in mid-December, we decided to have her party this weekend. I've always wanted to try cutting edible materials with my cricut, so I got out my retired Baby Bug, washed her down, got out my deep cut blade housing and set up for some edible cutting!

I made some Marshmallow Fondant and melted some white chocolate and coloured it with pink food colouring. I made some cuts on the fondant, which were quite successful, but DD decided she wanted the bunny pan instead of a round cake decorated. I still used the fondant for decorating, but only cut DD's name with the white chocolate. I think it turned out really nice, and she was thrilled!


My Sheri Crafts -- I am Thankful

In celebration of American Thanksgiving, My Sheri Crafts is doing a Thanksgiving challenge week! It got me thinking of what I'm thankful for, and I found this old picture of my mum. I don't remember seeing it much, it must have been in an old album, but it really inspired me. So, here's what I did with it:


And, I used my newest and most favorite cricut cartridge, Paper Lace. I love it, truly! I can see using it often, just like some of my favorite punches.


Supplies:

Paper: K&Co Tim Coffey Tuscan Sunflower
Liquid Pearls, Platinum
Cricut, Paper Lace for both embellishment and font
Brads

Friday, November 12, 2010

Photo Restoration with GIMP tutorial

For this week's LO I restored an old childhood photo. Here's the original:


And the edited version:


Major fixes were the large damaged area bottom right and the extensive scratching and discolouration. Less noticeable but important to the finished picture were the correction of the background and removal of the wire on the right. Here's a quick tutorial on how to do fixes like this using free software called GIMP:


Best watched on Youtube in 720p for a sharper video :-)

Thanks for stopping by! Love to hear your comments :-)

Thursday, November 11, 2010

My Sheri Crafts -- Bears!

My Sheri Crafts challenge this week is Teddy Bear themed. I found this old photo of me, and decided I'd make a cute little Teddy LO for my "All About Me" book:


November 1st I was able to download six free cricut cartridges for my Gypsy, and fortunately I only had one already. I was thrilled to gain the Christmas solutions cartridge, as I'd already wanted it but couldn't justify buying it since I already had Christmas Cheer and Winter Woodland. Here's my first cut from it, the teddy bear:


He's embossed with the A2 embossing folder, Textile Texture. I cut first, then used a cricut marker, then ran through my cuttlebug and chalked with Pebbles Chalk. Love that stuff, love the effect.


I'm forever a sucker for some of the MS punches, so this one got me last week. It's a new one, called Cherish. It's a PATP set, and it's beautiful! I'm sure it'll make it on to many of my LOs!


Supplies:
DVWC WB Gypsy Baby Stack
Martha Stewart Cherish Punch
Ribbon
Martha Stewart Antique Gold Glitter
Cuttlebug A2 embossing folder, Textile Texture
Pebbles Chalk

Friday, November 5, 2010

My Sheri Crafts -- Remembrance Day

This week's challenge on My Sheri Crafts is special: it's Remembrance Day (Veteran's Day for our American friends). My Uncle Stewart is a retired member of the British Armed Forces, and this is my favorite photo of him, on exercise sometime the 80's. Being so far away, I didn't grow up knowing him; but on visits to Northern Ireland as an adult, I have grown to appreciate what an amazing man he is.


Supplies:

Martha Stewart "Modern Garland" punch
Paper: DCWV "At Home" stack
Glossy Accents and Distress Stickles ("Broken China") on Uncle
Heritage cricut cartridge

Please check out the other inspirational projects atMy Sheri Crafts and enter yours!

Finally, I'd like to share this video with you. It was shown to my students on a field trip last week to the Calgary Military Museum. Please check out the Military Museum if you can. It's truly fabulous, and well worth a full days visit.


All Canadians who fall in the line of duty are repatriated through the base at Trenton, Ontario, and driven to Canada's chief coroner in Toronto. This has been the procession of the 152 men and women who have died in Afghanistan since 2002.

Friday, October 29, 2010

My Sheri Crafts -- Get Well Soon!

How appropriate! My littlest helper, "Wiggles", is almost three and on Friday night became quite ill. She vomited all over her daddy and again on me. Poor little one. As I write this, she's asleep on the floor, lying on a towel, beside me. She doesn't want to move, just stay close by.

Funny enough, our challenge on My Sheri Crafts this week is "Get Well Soon" and I made this card:


I like the cuts, from Just Because cricut cartridge, but I LOVE the ribbon detail. It was inspired by the paper weaving our kids do in school, but is a nice touch I think!

Make sure you enter your card (or other craft) in My Sheri Crafts blog this week!

Have a great weekend, and safe Halloween!

Saturday, October 23, 2010

My Sheri Crafts -- Halloween!

My Sheri Crafts is getting ready for Halloween! So is my class, and we made these fabulous water bottles:


Supplies:
Cricut vinyl
Cricut Happy Hauntings
Transfer tape
Halloween coloured ribbons
Glow in the dark beads

Make sure you enter your project at My Sheri Crafts for a chance to win!!

Friday, October 15, 2010

My Sheri Crafts -- Boss' Day Challenge

A quick little gift for My Sheri Crafts challenge: Boss's day! Make sure you enter your card or project for a chance at winning!


http://www.youtube.com/watch?v=sUsBvkfQKUw&feature=fvw#

Friday, October 8, 2010

My Sheri Crafts -- Stitching Challenge and MS Doily Tutorial

This week's challenge at My Sheri Crafts is "Stitching"! I love using my sewing machine on LOs, but I got this fabulous package of stickers from my LSS a while ago, that are actually meant to be stitched. Fun, huh?


Here's an up close of one of the stickers, stitched with metallic thread:


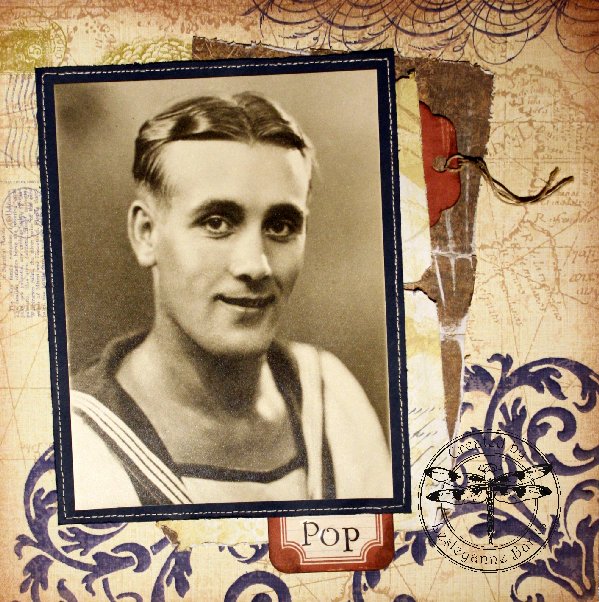
And the finished LO:


Another fun detail was making the doily that partly mats the photo.I love my Martha Stewart punches, and I'm always looking for ways to use them on things in new ways. I've made circle doilies before (see here) but this one doesn't require cutting into the pattern and uses a corner punch!

How to make the doily, using a Martha Stewart corner punch:

You'll need a circle and a corner punch. Not all punches work equally well. I'd suggest punches that have a sloping entry/exit into the pattern, or just experimenting.


This circle was cut 7.25".


Start punching! I flip my punch over to see exactly where the punch will occur. Keep the design close to the edge.


Line up the next punch section. Your pattern repeats should overlap, but not get too close.


The result. The last punch may not line up exactly. Since this will be layered under a photo, it doesn't matter. If I was going to use it and have it all show, I would "hide" the not-perfect lining up bit with ribbon or a prima flower.


There's a little triangle bit left over from the punch.


The triangle bit can be left, or removed with an exacto knife.

Fun! I hope you like this technique. It's a great way to extend the use of those fabulous punches (and go get some more!!)

Make sure you hop over to My Sheri Crafts and enter your stitching project for a chance to win!

Thursday, September 30, 2010

Breast Cancer Card

Run for the Cure

This week's My Sheri Crafts challenge is Think Pink for Breast Cancer. I made this card:


Instructions: Download and cut card sneaker.svg from the download box at the bottom of this post. Cut card base at 10.5" wide on dark pink. Cut proportional top layer in light pink. Chalk all edges with Pebbles Inc chalk. Layer and adhere. For most of my paper product, I use an ATG gun, especially with cards where I want it to stick and not move!

To make the awareness paper ribbon: cut a strip of paper 3/8" wide. Fold twice to create the ribbon shape, then trim ends on a sharp angle. Adhere together, then add a gem to the middle.


The following download box has access to all the cards I've made SVGs for. This one is the "card sneaker.svg" Enjoy!


Please make sure to enter your creation at My Sheri Crafts to have a chance at a great prize!

Friday, September 24, 2010

A Masculine Layout


Here's a photo and LO of my grandfather. I believe this photo was taken in about 1945 or a bit earlier, and it's been housed in a terrible frame with icky gummy tape and cardboard box behind it. What a relief to have it out! The matting was already showing age spots and what looked like mold. It hadn't gotten into the photo yet, so this was a joy to make a LO that might stand the test of time a bit better.


Supplies: all paper K&Co Blue Awning; tag K&Co Wild Saffrom; ink for edges; distressing tool for all matting; #12 embroidery thread for sewn edge.